Saturday, 5 March 2016

My Favourite Center Activities - Beginning of the Year

Centers are a big part of our day, they keep students occupied while I work with my guided groups. Carefully chosen centers allow students to work on skills taught in guided groups in a fun way.

Here are some of my favourite centers for the beginning of the year.

Make a Pizza
I have a numeral and alphabet versions. The can be found in my Beginning of the Year Centers pack.


In this activity, students make a pizza by matching the ingredients to the pizza base. This is a great way for students to consolidate their matching skills as well build familiarity with numerals and letters.

This is probably one of my most popular games. I even get requests for this game from my fast finishers :)

Clip A Word
Click here to find it on TPT.


In this activity, students pick a card and use pegs to 'clip' the letters that match. This helps with fine motor and letter recognition.

Number Tracing
Click here to find it on TPT.


In this activity, students trace over the numerals with a whiteboard marker. I love this activity because I feel that we spend a lot of time emphasising letter formation that we forget about numeral formation. So working on our numeral formation during guided maths groups is a great way to slip it into our daily routine.
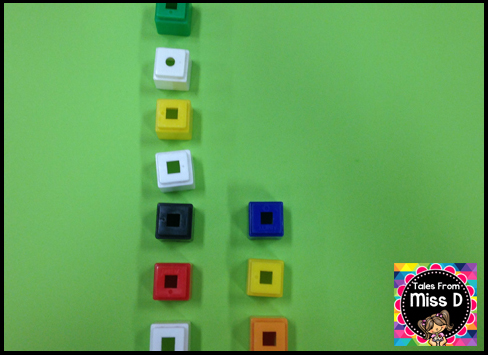
Matching Trains


For this activity, you can use these ten frame trains and unifix cubes. Alternatively, you can use a printed ten frame or an egg carton.

Students match the unifix cubes by colour to create 'passengers' for the train.

Duplo Letters and Numbers
The number cards can be found here and letters can be found here.


These have been a huge hit with my students. They love showing me the letters/numerals that they make :)

ChickaBoom Tweeze


This awesome mat can be found here, from My Fabulous Class.

In this activity, students use tweezers to pick letters and see if it matches the letters on their board. Once again a great activity for matching, fine motor and letter recognition.

Pipe Cleaner Letters and Numbers


In this activity, students use pipe cleaners to make letter and numbers. This activity helps students develop strength in their fingers through manipulating the pipe cleaner.

Pegboard Numbers


These pegboard cards can be found here.

Students use the pins to copy the number onto the pegboard.

Sorting


This is a simple activity that works with anything. All you need is a sorting tray and some tweezers. Students use tweezers to put the objects into groups. Students can sort by colour, shape, size, etc.

Hopefully you have found some inspiration on here. Got any ideas to share? Let me know through email or comment below :)

Enjoy your weekend!

Sunday, 15 November 2015

Sight Word Tracking & Assessing

Keeping track of sight words has been a lot easier with my Sight Word Track & Assess tool.

https://www.teacherspayteachers.com/Product/Sight-Word-Tracking-and-Assessment-2208073
Click on the picture above to check it out on TPT.

There are three different ways this can be used;

1) Track on a whole class sheet
2) Track on individual assessment sheets
3) Track on a whole class sheet and an individual sheet

I prefer doing option 3. Yes, it means more work for me, but it means that at the end of the year, I'll have a sheet which I can pass onto the next teacher so that they don't have to start again from scratch. It also means I can easily see trends on the whole class sheet to plan my guided sessions.

Here's a peek at whats included in the pack;

Whole class tracking sheet
Boxes are highlighted when students can read the word. I use a different coloured highlighter each time to show progression. I record the key at the top of the page.

I love this, as it's easy to see which words need to be taught/retaught and any common patterns.

Flashcards


I prefer holding flashcards up rather than having students read of the sheet. I find that some students become overwhelmed when they see a sheet full of words. Print on coloured card if you want to sort them into different levels or look a bit more exciting than plain white.

Individual Assessment Sheet


This can be used to keep a record that can be passed onto the next teacher. Hold up flashcards and highlight if the student can read the word. Once again, use a different coloured highlighter if you want to track progression.

Click on the picture below to find it on TPT.

https://www.teacherspayteachers.com/Product/Sight-Word-Tracking-and-Assessment-2208073

Thursday, 12 November 2015

Guided Writing

This year has been a big learning curve for me in terms of teaching. The school I'm at has had a big focus on 'guided groups', which has changed the way I teach.

I've been experimenting with Guided Writing Groups. I'm no expert on the subject but so far, I have seen a big growth in my students writing. Here's how I run guided writing in my classroom.

#1 - Plot students on the 'Aspects of Writing' section of the Literacy Continuum
In NSW, we have a Literacy Continuum. We use this to track student progress and see the 'where to next'. This helps us plan and develop activities which target specific needs.

#2 - Group students according to where they sit on the continuum.
Once students have been plotted, I form my groups based on what 'cluster' they're at.

#3 - Develop a goal
I then look at the 'where to next' and choose a point to focus on. For Kindergarten the goals for the year are;

I can leave spaces between the words (cluster 2)
I can use capital letters and full stops (cluster 3)
I can sound out words that I don't know to help me write them (cluster 3 & 4)
I can correctly spell sight words (cluster 4)
I can write more than one sentence (cluster 4)
I can add detail to my sentence by using adjectives (cluster 5)

I have these on display as a step chart. Student names are on a pencil and the pencils are moved according to what goal they are working on.


#4 - The Session - No more than 4 students
What we write about depends on what we are learning about at the time.

I use a log book to take notes and keep track of what we have covered.


The log book has a space at the top for the group goal and space for anecdotal notes on what writing behaviours each student displays. At the end of the week, once all sessions have been complete, I look back over the notes and make any necessary adjustments to groups or goals.

In the session I provide each student with targeted support. Having a small group means that I am able to provide individualised support for each student.

Once students have completed their writing, I mark their work with them. I have a rubric that relates to each goal;


I refer to this rubric when marking and giving feedback. Usually the number of ticks or stamps refers to how well they've achieved their goal ("working towards", "almost there" and "I've got it"). I've also developed a tracking sheet (right image) to use for next year to help keep my student portfolios neater.

That's pretty much it. If you're interested in the pack, you can find it by clicking here or on the picture below :)

https://www.teacherspayteachers.com/Product/Guided-Writing-2202497

Visual Word Wall

The visual word wall has always been the most used 'interactive' wall in my classroom.

What is a visual word wall and how does it differ from a word wall? The cards have a picture to match the word. This assists students in finding the word that they are looking for. Working in a school with a high population of ESL students, I can't ever imagine using a word wall with no visuals.

Here are some pictures of my Word Wall over the years;


These aren't neat because these walls get used everyday. Let's be honest no working word wall is ever going to stay tidy!

I've had different ways of organising the cards; no organisation, nouns/verbs/adjectives and alphabetically. Overall my favourite way is the alphabetical method. This saves a LOT of time when finding words and aids in reinforcing letter/sound relationships. 

Sorting the cards alphabetically also lends itself to playing fun games such a word hunt - say a word and have students find it on the word wall.

The word cards are based on words that students would use most often. I update the cards when I see a common need or when words keep popping up in student writing.

Check out my Visual Word Wall by clicking the picture below. The cards with items like iPad, PlayStation and Mc Donald's are not included. However I've left blank cards in the product if you would like to make your own for use in your own classroom.


https://www.teacherspayteachers.com/Product/Visual-Word-Wall-2202315

Monday, 9 November 2015

Comparing Numbers

It's nearing the end of the school year here in Australia, so one thing that we've all been doing is going through the syllabus and making sure that we've covered each content strand.

Looking through the syllabus, the team all agreed that we needed more work on the strand; comparing numbers to determine 'how many more'

As a team, we decided on the best way to teach this concept and that this would be the modelled part of our guided maths session.

#1 - Get two groups of objects (can be counters, unfix cubes, etc).

#2 - Line up objects side by side, making sure the objects match/have a partner.

#3 - Look at where the matches stop and separate the objects that don't have a partner.

#4 - The objects that don't have a partner tell us 'how many more' are in the group.

When introducing the concept, stick to examples that don't have a huge difference i.e do 7 and 4 not 5 and 20. Keep it simple with small differences. Work on larger differences in the guided group part.

Of course, I want my students to be applying this independently while I am working with my small groups, so I made two centers that work on developing this skill.

Activity #1


In this activity, students pick a card and place that many counters/cubes on the top row. They pick another card and place that many counters/cubes on the bottom row. They then look at where the matching stops to determine 'how many more' and write the number at the bottom.

The grid is a great way for students to make sure the objects are lined up properly. If the objects are not lined up, then this strategy falls apart.

Activity #2
In this activity, students pick a card and make towers that correspond with the numbers. To find out how many more, students break the tower so that they become even. The amount broken off will reveal 'how many more'.


Students can then write the answer on the line.

Very simple, yet effective activities for students to develop this skill. You can find this product by clicking on the picture below :)

https://www.teacherspayteachers.com/Product/Comparing-Numbers-2191590


Enjoy the rest of your week!

Monday, 5 October 2015

New Term, New Centers!

Tomorrow will be the start of Term 4! For the non-Aussie teachers out there, that means the last 11 weeks of the school year. I can't believe how quickly the time has gone! Feels like just a few months ago it was the start of the year. Yikes!

Centers have been a big part of our daily routine this year. I'm always swapping them around to keep things interesting. Of course, now that it's nearing the end of the year, my kiddos are outgrowing the centers that I've been using. So I spent my holidays making some new centers that focus on the skills that we have been working on. Here are just a few that I'm excited to introduce this week;

Initial Sounds Detective - CVC Edition 

This activity requires students to look at the picture and work out the initial sound. They then write it in the box underneath the picture. The letters will spell out a CVC word. I love this activity because it's a great way to revise initial sounds and practise letter formation. Check it out here.

CVC - Race to Cover

This activity requires students to read a CVC word and see if they have a match on their board. This is a great way for students to practise sounding out. Check it out here.

CVC Clip It!

Students look at the picture, say the word and then clip the correct spelling with a peg. A great way to practise sounding out and develop fine motor skills! Check it out here.

Subtraction Math Centers


Three activities that require students to use subtraction to find the answer. Check it out here.

Domino Math Centers


Dominoes are a great way to incorporate key math skills in the classroom. These are just two out of the three domino activities in my Domino Math Centers pack.

The best part about all of these centers? they don't require too much cutting and there are no fiddly pieces! :)

Keep up to date with all my new products and sales by following my TPT Store, Twitter or Facebook page.

Happy teaching!

Sunday, 16 August 2015

STEM in Kindergarten

My Kindergarten class has been participating in STEM type challenges for the past 4 weeks. I'm loving it and so are the students!

I should probably clarify that I am no expert, all that I know about STEM is from reading blogs and looking at Pinterest. It caught my eye because it looked like a lot of fun and my students seem to really enjoy hands on science and math activities.

For our first challenge we did 'Build a house that the Big Bad Wolf can't blow down'. For this challenge, students could only use masking tape, paddle pop sticks, matchsticks and rubber bands.
The Big Bad Wolf was myself and my support teacher. We created a wind by frantically flapping a plastic document wallet.

As this was the first session, I didn't really go into the design process. I just wanted to see if this would actually work in my room; would anything be built? would it cause fights? would it cause tears? I also wanted to see what we needed to work on in order for this to become a weekly activity.

Overall the first session was a success. The houses that were built were pretty stable. Only 2 out of the 10 fell over. I was quite proud. Though one thing that we needed to work on was the concept of "working together as a team" and the notion of a growth mindset.

So I whipped up this resource to tackle the teamwork problem.

https://www.teacherspayteachers.com/Product/Social-Skills-for-STEM-and-group-tasks-2002253

It's a poster set with each social skill and what each skill actually means. It's all good to say "you need to work together" but what does that actually look like? What needs to be done? This pack makes it pretty explicit.

Our second challenge was 'Build a boat that will carry two teddies'. Before starting this challenge, I went through the skill cards and we discussed what each one meant and what it looked like. I hung up the prompt cards on the board as a visual reminder. I also introduced two Growth Mindset phrases which can be found on these two FREE posters. Click on the picture to get your own copy.

https://www.teacherspayteachers.com/Product/Growth-Mindset-Posters-FREEBIE-2002213
We went into the challenge chanting these!
 
Introducing the social skills before the session made a difference. I noticed that there was a lot more sharing, communication and teamwork during this session. Success!

For the boat, students used foil, straws, paper cups and masking tape. For the two teddies we used teddy bear counters.

Some of the boats were pretty fancy, I was not expecting them to be so elaborately designed. Most floated but some started to sink after a while.

At the end of the session, we walked around and looked at each boat. Then we came to the floor and talked about what we discovered. For the boats that sunk, I asked the groups why they thought it happened and what could they do next time to fix it.

Our third challenge was 'Build the tallest tower you can using only pipecleaners'. Once again, before starting, we talked about social skills and got into the notion of a growth mindset "I can! I can! I can!".

In this session, I noticed more students working on fixing their existing designs rather than just starting again all the time - which is part of the 'improve' phase. Not that I have explicitly taught these phases yet! That will be the next step now that the teamwork aspect has been covered.

I should also mention, that while students are completing the challenges I go around to each group and we have a brief discussion about what is happening. This is a great way to hear student thinking and prompt them in improving their design.

We have a STEM wall in our classroom. I take photos during each session and while we are having our reflection at the end, I scribe what the students have discovered. It's then hung up on the wall.

My display :)


This week I'm going to go through the Engineering Design Process and get some planning down. I'm thinking of doing this on the mini-whiteboards as this will allow them to change and rub out easily. Especially as this will be the first time and I'm anticipating that there will be a lot of rubbing out! This will link in perfectly with what we have being doing in maths - recording our working/thinking.

The only problem is deciding on what challenge to do next! There are so many awesome ideas!

If you are thinking of doing STEM in your classroom, go for it! It has a number of benefits including;

1. Fine motor skills
2. Teamwork
3. Problem solving
4. Critical thinking
5. Creative thinking
6. Communication & reasoning